背景
最近在开发coderbbb网站的时候,因为要给读者用户和作者之间搭建一套即时通讯系统,来让付费读者和作者能够方便的沟通。当读者看完文章,仍有疑问时可以通过这个IM系统方便的咨询文章作者。所以最近调研了环迅、声网等IM商业系统。功能虽然很强大,但是和我的需求不太吻合。主要有两个问题:
- 免费版本,注册用户有限制。这个就不说什么了,大家都是要吃饭的。
- 聊天记录有保存时长。因为要做的IM系统是给付费用户的,用户花了钱,那么咨询问题的聊天记录,以后可能还要随时翻看,所以我们要做到聊天记录永久保存。
基于以上两点,我们打算自己开发一套简单的IM系统来满足需求。选用的技术栈如下:
- 前端使用vue配合websocket来和后端建立TCP长连接。
- 后端使用springboot+netty来处理前端发来的各种消息、持有客户端的TCP长连接。
- 数据库前期使用mysql,后面量大之后迁移到TIDB或列存储数据库(比如阿里云的表格存储)等。
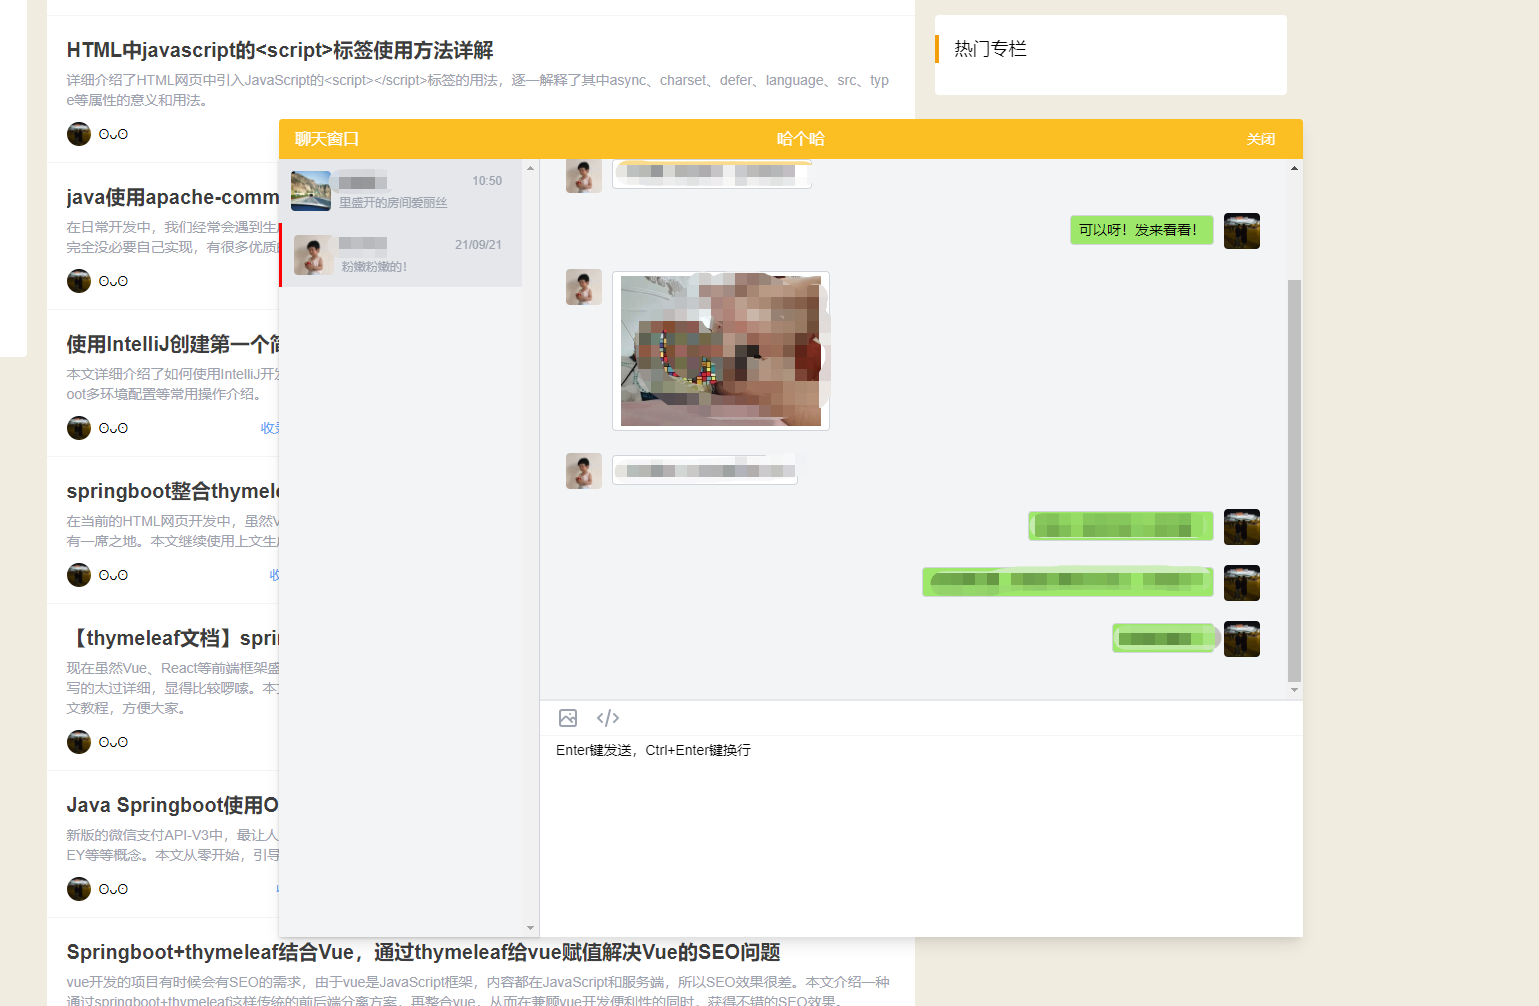
效果演示

实现了文字、图片、代码三种消息的发送,因为用户可能打开多个网页,所以多个网页发送消息会自动同步(类似微信的电脑端和手机端)。没有好友管理的界面,但底层逻辑是支持的,因为coderbbb的咨询系统是不需要传统意义上的通讯录的。
Springboot+netty后端开发
springboot自己本身也支持websocket,但是本身限制较多,没有netty灵活,所以我们选择使用netty作为websocket的服务端。
1.通过maven引入netty
<dependency>
    <groupId>io.netty</groupId>
    <artifactId>netty-all</artifactId>
    <version>4.1.68.Final</version>
</dependency>
2.编写netty启动类
该类主要是配置netty的websocket ssl证书,配置websocket启动的端口等等配置项。其中WebSocketHandler是我们自定义的Handler,用来处理websocket连接的新建、断开,以及消息的收发等。
package com.coderbbb.blogv2.netty;


import com.coderbbb.blogv2.netty.handler.WebSocketHandler;
import io.netty.bootstrap.ServerBootstrap;
import io.netty.channel.ChannelFuture;
import io.netty.channel.ChannelInitializer;
import io.netty.channel.ChannelOption;
import io.netty.channel.EventLoopGroup;
import io.netty.channel.nio.NioEventLoopGroup;
import io.netty.channel.socket.SocketChannel;
import io.netty.channel.socket.nio.NioServerSocketChannel;
import io.netty.handler.codec.http.HttpObjectAggregator;
import io.netty.handler.codec.http.HttpServerCodec;
import io.netty.handler.codec.http.websocketx.WebSocketServerProtocolHandler;
import io.netty.handler.ssl.SslContext;
import io.netty.handler.ssl.SslContextBuilder;
import io.netty.handler.stream.ChunkedWriteHandler;
import org.slf4j.Logger;
import org.slf4j.LoggerFactory;
import org.springframework.core.io.ClassPathResource;


/**
 * @author longge93
 */
public class NettyServer {

    private final Logger logger = LoggerFactory.getLogger(this.getClass());

    private final int port;

    private final SslContext sslContext;

    public NettyServer(int port) throws Exception {
        this.port = port;

        //让websocket支持SSL证书,从WS://升级到WSS://
        ClassPathResource pem = new ClassPathResource("wss/coderbbb.com.pem");
        ClassPathResource key = new ClassPathResource("wss/s.key");
        this.sslContext = SslContextBuilder.forServer(pem.getInputStream(), key.getInputStream()).build();
    }


    public void run() throws Exception {
        EventLoopGroup bossGroup = new NioEventLoopGroup();
        EventLoopGroup workerGroup = new NioEventLoopGroup();
        try {
            ServerBootstrap b = new ServerBootstrap();
            b.group(bossGroup, workerGroup)
                    .channel(NioServerSocketChannel.class)
                    .childHandler(new ChannelInitializer<SocketChannel>() {
                        @Override
                        public void initChannel(SocketChannel ch) throws Exception {
                            ch.pipeline()
                                    .addLast(sslContext.newHandler(ch.alloc()))
                                    .addLast(new HttpServerCodec())
                                    .addLast(new ChunkedWriteHandler())
                                    .addLast(new HttpObjectAggregator(8192))
                                    .addLast(new WebSocketServerProtocolHandler("/ws", null, true))
                                    .addLast(new WebSocketHandler())
                            ;
                        }
                    })

                    .childOption(ChannelOption.TCP_NODELAY, Boolean.TRUE)
                    .childOption(ChannelOption.SO_KEEPALIVE, Boolean.TRUE);

            // 绑定端口,开始接收进来的连接
            ChannelFuture f = b.bind(port).sync();
            f.channel().closeFuture().sync();
        } finally {
            workerGroup.shutdownGracefully();
            bossGroup.shutdownGracefully();
        }
    }

}
关于netty+websocket如何配置使用SSL证书,请移步《Netty使用阿里云SSL证书配置SSL》阅读。
3.编写handler处理连接和消息
网上搜很多netty+websocket的教程,大部分教程都需要实现一个特别复杂的handler来实现websocket建立连接的整个过程,已经深入到websocket协议本身了(比如会去实现upgrade等header头的解析等等)。非常搞笑的是,网上这套handler的代码,其实大部分是从netty自己的源码里粘贴出来的。明明直接用netty的WebSocketServerProtocolHandler就可以了,但是网上的这些教程非得把netty的源码复制出来……
更神奇的是,就这样的源码,又被转载了无数次~导致你现在一搜netty+websocket,首页大部分都是这套神逻辑的代码。
我们的代码如下:
package com.coderbbb.blogv2.netty.handler;

import com.coderbbb.blogv2.BlogV2Application;
import com.coderbbb.blogv2.config.mj.ChatAction;
import com.coderbbb.blogv2.config.mj.WxScanLoginType;
import com.coderbbb.blogv2.database.dos.UserDO;
import com.coderbbb.blogv2.netty.ChatClientManage;
import com.coderbbb.blogv2.service.AliyunOssAdvanceService;
import com.coderbbb.blogv2.service.ChatService;
import com.coderbbb.blogv2.service.UserCookieTokenService;
import com.fasterxml.jackson.databind.ObjectMapper;
import io.netty.channel.ChannelHandlerContext;
import io.netty.channel.SimpleChannelInboundHandler;
import io.netty.handler.codec.http.websocketx.TextWebSocketFrame;
import org.apache.commons.codec.binary.Base64;
import org.slf4j.Logger;
import org.slf4j.LoggerFactory;

public class WebSocketHandler extends SimpleChannelInboundHandler<TextWebSocketFrame> {

    private final Logger logger = LoggerFactory.getLogger(this.getClass());

    @Override
    protected void channelRead0(ChannelHandlerContext ctx, TextWebSocketFrame msg) throws Exception {

        String message = msg.text();

        System.out.println("收到消息:" + message);

    }

    @Override
    public void channelActive(ChannelHandlerContext ctx) throws Exception {
        //添加连接
//        System.out.println("客户端加入连接:" + ctx.channel().id().asShortText());
    }

    @Override
    public void channelInactive(ChannelHandlerContext ctx) throws Exception {
        //断开连接
//        System.out.println("客户端断开连接:" + ctx.channel().id().asShortText());

        ChatClientManage.remove(ctx.channel());
    }

    @Override
    public void channelReadComplete(ChannelHandlerContext ctx) throws Exception {
        ctx.flush();
    }

    @Override
    public void exceptionCaught(ChannelHandlerContext ctx, Throwable cause) throws Exception {
        logger.error("websocket err:", cause);
        super.exceptionCaught(ctx, cause);
    }
}
这里有一个地方需要注意:消息传递是通过TextWebSocketFrame这个类的,当你收到消息、发送消息都是通过发送这个类的实体对象来的,相当于一个netty定义好的消息结构。当你收到一个TextWebSocketFrame,假如你要多次使用这个类,或者想把收到的直接返回给客户端,一定要调用TextWebSocketFrame的copy方法复制一个新的出来用。原因是类似这样的netty类,读取的时候都有类似游标的逻辑,多次、重复使用同一个实体对象,需要不停的重置,比较麻烦。
4.启动说明
启动的时候,只需要new NettyServer就可以了。比如:
try {
    NettyServer nettyServer = new NettyServer(8902);
    nettyServer.run();
} catch (Exception e) {
    logger.error("start netty server err", e);
}
配置项主要有两个,一个是启动的端口,在new NettyServer的时候传入。另一个是websocket的路径(上文代码中是/ws),是写在netty server类里的,当然你也可以提取出来,作为构造参数传入。比如我们上文的完整websocket地址就是wss://127.0.0.1:8902/ws。其中/ws就是路径。wss://是ws://的升级版,使用了SSL证书,类似http和https的区别。
Vue+WebSocket前端开发
前端就比较简单了,这里是使用Vue+WebSocket来实现的。下面是核心的Vue method,用来控制websocket的连接建立断开、消息收发。
initWebSocket() {
    if (typeof (WebSocket) === "undefined") {
        alert('您的浏览器不支持socket,将无法使用聊天功能');
        return;
    }

    this.socket = new WebSocket(SOCKET_SER);
    // 监听socket连接
    this.socket.onopen = this.openWebSocket;
    // 监听socket错误信息
    this.socket.onerror = this.errorWebSocket
    // 监听socket消息
    this.socket.onmessage = this.getMessageWebSocket
},
openWebSocket: function () {
    // console.log("socket连接成功,准备登录");
    this.loginWebsocket();
},
errorWebSocket: function () {
    console.log("连接错误")
},
getMessageWebSocket: function (msg) {
    console.log("收到服务器消息=============" + msg.data)
},
sendWebSocketMsg: function () {

    this.socket.send("MSG")
},
closeWebSocket: function () {
    console.log("socket已经关闭")
},
其中,SOCKET_SER就是后端websocket的地址,比如ws://127.0.0.1:8902
更多功能
上面的代码,只是实现了前端和后端之间的websocket通讯,如果要做IM系统,还需要实现不同的消息类型、实现消息的保存、好友关系的管理等等。这些逻辑就比较复杂了,而且每个人的需求不一样,逻辑也就不一样了。如果有需要的,可以点击右上角【咨询作者】,来参考coderbbb的IM系统代码。


